Connect with us

Tech

The Venturi Mask: A Lifeline in Precision Oxygen Delivery

Published

on

The Venturi Mask: A Lifeline in Precision Oxygen Delivery

What is a Venturi Mask?

The Venturi mask is a medical device used to deliver a controlled oxygen concentration to patients who require supplemental oxygen. Named after the Italian physicist Giovanni Battista Venturi, the mask works on the principle of the Venturi effect, which allows for precise control of airflow by mixing oxygen with room air. This method helps in delivering an exact concentration of oxygen, something that’s crucial for patients with respiratory conditions like COPD (Chronic Obstructive Pulmonary Disease) who can suffer adverse effects from receiving too much oxygen.

The Venturi Effect

The Venturi effect is a principle of fluid dynamics where the pressure of a fluid decreases as it passes through a narrow section of a pipe, while its velocity increases. The Venturi mask utilizes this principle to mix oxygen with the air at specific concentrations. Depending on the size of the nozzle attached, different oxygen concentrations can be achieved with high accuracy, ranging from 24% to 60% oxygen.

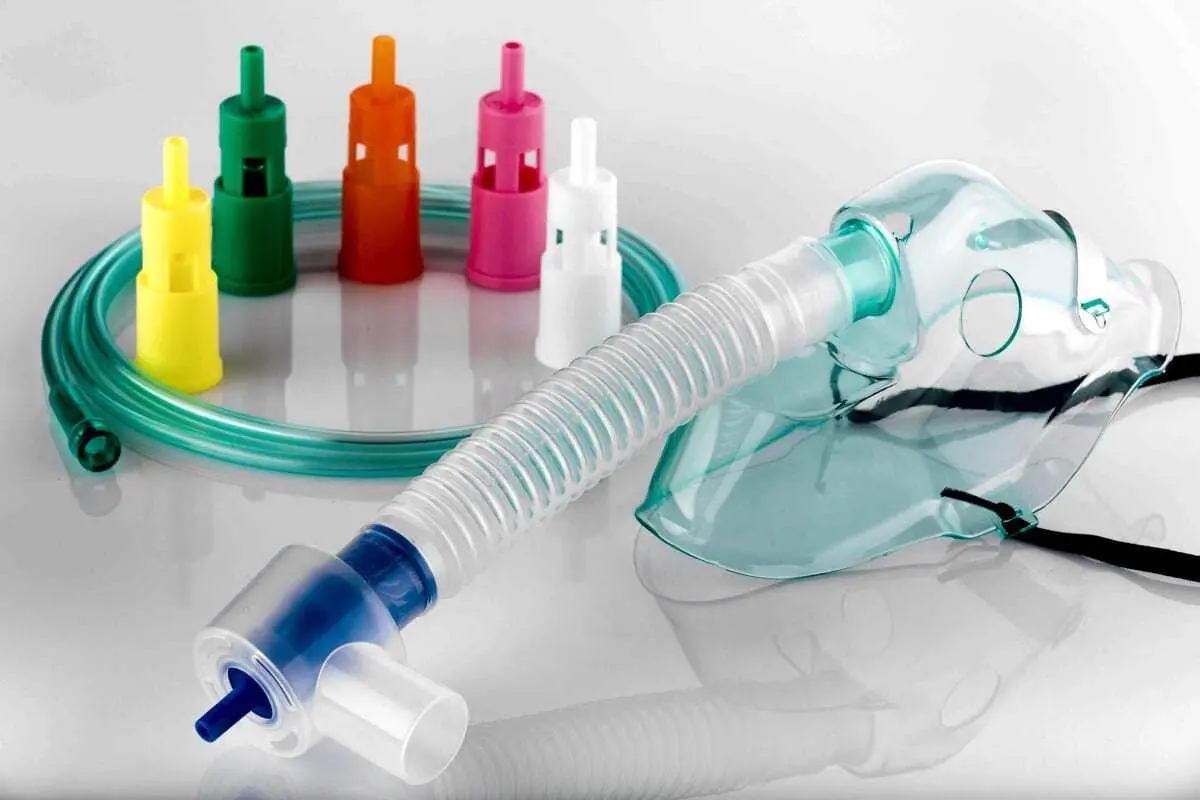
Venturi Mask Components

A Venturi mask consists of several parts, each playing a role in achieving the desired oxygen concentration:

  • Mask: Covers the nose and mouth of the patient.
  • Oxygen inlet: Connected to an oxygen supply, usually a tank or wall outlet.
  • Jet nozzle: Inserts into the oxygen tube, controlling the amount of oxygen flowing.
  • Color-coded diluters: Each color corresponds to a specific oxygen concentration.

Common Color-Coded Diluters:

  • Blue: 24% oxygen
  • White: 28% oxygen
  • Yellow: 35% oxygen
  • Red: 40% oxygen
  • Green: 60% oxygen

These colors help medical staff quickly identify and adjust oxygen levels as needed, ensuring precision and ease of use.

Why Choose a Venturi Mask?

The Venturi mask is ideal for patients requiring specific oxygen concentrations, such as those with chronic lung diseases like COPD. These patients can experience a life-threatening condition called hypercapnia if given too much oxygen. By delivering a carefully measured amount of oxygen, the Venturi mask helps avoid this danger.

This precision is the key difference between the Venturi mask and simpler oxygen delivery systems, such as nasal cannulas or simple face masks, which do not provide the same level of control over the oxygen concentration.

Other Key Benefits

  1. Ease of Use: The Venturi mask is relatively easy to operate, making it user-friendly for healthcare professionals.
  2. Non-invasive: It provides oxygen without the need for more invasive devices, like endotracheal tubes.
  3. Adjustability: Healthcare providers can quickly change the oxygen concentration by swapping out the color-coded adapters, tailoring the treatment to the patient’s needs.

When is a Venturi Mask Used?

The Venturi mask is most commonly used in patients with chronic respiratory diseases. These include:

  • Chronic Obstructive Pulmonary Disease (COPD): Patients with COPD are particularly sensitive to oxygen levels. Too much oxygen can suppress their natural drive to breathe.
  • Emphysema: A type of COPD that damages the air sacs in the lungs, reducing their ability to take in oxygen.
  • Bronchitis: Chronic bronchitis causes inflammation of the bronchial tubes, which carry air to the lungs.
  • Asthma: Severe asthma attacks that restrict airflow may require the use of oxygen therapy.

In these cases, the Venturi mask ensures that patients receive enough oxygen to improve their blood oxygen levels without risking complications associated with excessive oxygen intake.

Post-Operative Care

In the post-operative setting, where patients may have compromised lung function due to anesthesia or surgery, the Venturi mask is often used to provide consistent oxygen delivery. It ensures that the patient gets just enough oxygen to support recovery without overloading the system.

Limitations of the Venturi Mask

While the Venturi mask is highly effective for certain patients, it is not without limitations:

  1. Restricted Oxygen Range: It delivers oxygen within a limited range (24%-60%), so it may not be suitable for patients who need very high concentrations.
  2. Bulkiness: Some patients may find the mask uncomfortable, especially during prolonged use.
  3. Noisy: The high airflow can be noisy, which may be bothersome for sensitive patients.

Venturi Mask vs Other Oxygen Delivery Systems

There are several oxygen delivery devices in use, but the Venturi mask stands apart due to its precision. Here’s a quick comparison:

  • Nasal Cannula: Delivers low-flow oxygen and is less precise. Best for patients who need only a slight boost in oxygen.
  • Simple Face Mask: Provides higher flow rates but cannot control the concentration of oxygen as accurately as a Venturi mask.
  • Non-Rebreather Mask: Delivers high concentrations of oxygen, but without the controlled precision of a Venturi mask, making it unsuitable for some chronic conditions.

Each device has its place in patient care, but for those needing exact oxygen concentrations, the Venturi mask is often the best option.

How to Use a Venturi Mask

The application of a Venturi mask is straightforward but requires care:

  1. Select the correct color-coded diluter for the desired oxygen concentration.
  2. Connect the mask to the oxygen source, making sure the flow rate matches the diluter’s instructions.
  3. Fit the mask securely over the patient’s nose and mouth, ensuring a snug but comfortable fit.
  4. Monitor the patient closely, adjusting the concentration as needed.

Conclusion

The Venturi mask is a versatile and life-saving tool in the world of respiratory care. It offers precise oxygen delivery, which is crucial for patients with chronic respiratory diseases who cannot tolerate too much or too little oxygen. By understanding the Venturi effect and how the mask works, healthcare providers can ensure better outcomes for their patients.

FAQs

1. What oxygen concentrations can a Venturi mask deliver?
A Venturi mask can deliver oxygen concentrations ranging from 24% to 60%, depending on the color-coded diluter used.

2. Can I use a Venturi mask at home?
While it’s primarily used in clinical settings, a Venturi mask can be used at home under the guidance of healthcare professionals, especially for chronic conditions like COPD.

3. Why is the Venturi mask better for COPD patients?
Patients with COPD are sensitive to high oxygen levels. The Venturi mask allows precise control over the oxygen concentration, reducing the risk of hypercapnia.

4. Is the Venturi mask uncomfortable?
While some patients may find it bulky or noisy, it is generally well-tolerated for short-term use. Longer-term patients might prefer other options like nasal cannulas.

5. How does the Venturi mask differ from a nasal cannula?
The nasal cannula provides low-flow oxygen without controlling concentration levels, while the Venturi mask offers precise oxygen delivery, ideal for specific medical needs.

Continue Reading
Click to comment

Leave a Reply

Your email address will not be published. Required fields are marked *

Tech

The Ultimate Guide to Smart Home Devices: Revolutionizing Modern Living

Published

on

By

The Ultimate Guide to Smart Home Devices: Revolutionizing Modern Living

Introduction

Smart home devices have transformed the way we interact with our living spaces, offering convenience, security, and energy efficiency like never before. From voice-controlled assistants to automated lighting and security systems, these technologies are making homes more intuitive and responsive.

This comprehensive guide explores the different types of smart home devices, their benefits, potential drawbacks, and future trends. Whether you’re a tech enthusiast or a beginner looking to upgrade your home, this article will provide valuable insights into the world of smart home technology.

Chapter 1: What Are Smart Home Devices?

Smart home devices are internet-connected gadgets that automate and enhance household functions. They can be controlled remotely via smartphones, voice commands, or automated schedules. These devices rely on technologies like:

  • Artificial Intelligence (AI) – Enables learning user preferences over time.
  • Internet of Things (IoT) – Connects devices to a central network.
  • Voice Recognition – Allows hands-free control via virtual assistants like Alexa or Google Assistant.

Common Categories of Smart Home Devices

  1. Smart Speakers & Assistants (Amazon Echo, Google Nest)
  2. Smart Lighting (Philips Hue, LIFX)
  3. Smart Thermostats (Nest, Ecobee)
  4. Smart Security Systems (Ring, Arlo)
  5. Smart Locks & Doorbells (August, Yale)
  6. Smart Appliances (Samsung Smart Fridge, Robot Vacuums)
  7. Smart Entertainment Systems (Smart TVs, Streaming Devices)

Each of these devices contributes to a more connected and efficient home environment.

Chapter 2: Benefits of Smart Home Devices

1. Convenience & Automation

Smart homes allow users to automate repetitive tasks:

  • Lights turn on/off based on motion or schedules.
  • Thermostats adjust temperatures automatically.
  • Robot vacuums clean floors without manual input.

2. Enhanced Security

  • Smart cameras provide real-time surveillance.
  • Smart doorbells allow video calls with visitors.
  • Smart locks enable remote access control.

3. Energy Efficiency & Cost Savings

  • Smart thermostats optimize heating/cooling, reducing energy bills.
  • Smart plugs cut power to idle devices, preventing “vampire energy” drain.

4. Remote Access & Control

Whether you’re at work or on vacation, smart home apps let you:

  • Check security cameras.
  • Adjust thermostat settings.
  • Lock/unlock doors remotely.

5. Accessibility for Elderly & Disabled Users

Voice-controlled devices assist those with mobility challenges by enabling hands-free operation.

Chapter 3: Potential Drawbacks of Smart Home Devices

While smart home technology offers numerous advantages, there are some challenges:

1. High Initial Costs

Premium smart devices can be expensive, and outfitting an entire home may require a significant investment.

2. Privacy & Security Risks

  • Hackers can exploit vulnerabilities in IoT devices.
  • Always-on microphones in smart speakers raise privacy concerns.

3. Compatibility Issues

Not all devices work seamlessly together. Some may require specific hubs (e.g., Apple HomeKit vs. Google Home).

4. Dependence on Internet Connectivity

A weak Wi-Fi signal can disrupt smart home functionality.

5. Learning Curve

Some users may find it challenging to set up and integrate multiple devices.

Chapter 4: Top Smart Home Devices in 2024

Here are some of the best smart home devices currently available:

1. Best Smart Speaker: Amazon Echo (4th Gen)

  • Features Alexa voice control.
  • High-quality audio with Zigbee hub support.

2. Best Smart Thermostat: Google Nest Learning Thermostat

  • Learns user preferences.
  • Energy-saving AI adjustments.

3. Best Smart Lighting: Philips Hue

  • Millions of color options.
  • Works with Alexa, Google Assistant, and Apple HomeKit.

4. Best Smart Security Camera: Arlo Pro 4

  • Wireless, weather-resistant.
  • 2K video with night vision.

5. Best Robot Vacuum: Roborock S7 MaxV

  • Self-emptying dustbin.
  • AI-powered obstacle avoidance.

Chapter 5: Future Trends in Smart Home Technology

The smart home industry is evolving rapidly. Here’s what to expect in the coming years:

1. Increased AI Integration

Devices will become more predictive, learning routines without manual programming.

2. Expansion of Matter Protocol

A universal smart home standard improving cross-brand compatibility.

3. Growth of Edge Computing

Reducing reliance on cloud processing for faster, more private operations.

4. More Sustainable Smart Homes

Solar-powered devices and energy-efficient automation will rise.

5. Advanced Health Monitoring

Smart mirrors and beds that track sleep patterns, heart rate, and more.

Conclusion

Smart home devices are reshaping modern living by offering unparalleled convenience, security, and efficiency. While challenges like cost and privacy exist, advancements in AI and IoT continue to make these technologies more accessible and reliable.

As the industry grows, we can expect even smarter, more integrated homes that anticipate our needs seamlessly. Whether you’re starting with a single smart speaker or building a fully automated home, the future of smart living is here—and it’s only getting better.

Continue Reading

Tech

iPhone 16 Rumors: Everything We Know So Far

Published

on

By

iPhone 16 Rumors: Everything We Know So Far

The iPhone 16 series is already generating significant buzz, even though Apple has yet to officially announce it. With each new iteration, Apple introduces cutting-edge technology, refined designs, and enhanced features. Based on leaks, analyst predictions, and supply chain reports, we’ve compiled the most credible rumors about the iPhone 16 lineup, including the iPhone 16, iPhone 16 Plus, iPhone 16 Pro, and iPhone 16 Pro Max.

1. Expected Release Date

Apple typically unveils its new iPhones in September, and the iPhone 16 series is expected to follow this trend. The most likely announcement date is September 10 or 17, 2024, with pre-orders starting shortly after and the official release on September 20 or 27, 2024.

2. iPhone 16 Models & Possible Pricing

The iPhone 16 lineup will likely consist of four models:

  • iPhone 16 (6.1-inch) – Starting at $799
  • iPhone 16 Plus (6.7-inch) – Starting at $899
  • iPhone 16 Pro (6.3-inch) – Starting at $999
  • iPhone 16 Pro Max (6.9-inch) – Starting at $1,099

Prices may remain similar to the iPhone 15 series, though inflation and new technologies could lead to slight increases.

3. Design Changes & New Features

A. New Button: “Capture Button”

One of the most talked-about rumors is the addition of a new capacitive “Capture Button” on all iPhone 16 models. This button, located below the power button, is expected to be touch-sensitive (like the iPhone SE’s Home Button) and could be used for:

  • Quick photo/video capture
  • Focus adjustments
  • Zoom controls

This would be Apple’s first new physical button since the iPhone 15 Pro’s Action Button.

B. Larger Displays for Pro Models

  • iPhone 16 Pro: Expected to grow from 6.1″ to 6.3″
  • iPhone 16 Pro Max: Expanding from 6.7″ to 6.9″
    This increase would allow for better battery life and possibly new display technologies.

C. Thinner Bezels & New Materials

Apple is reportedly working on ultra-thin bezels using Border Reduction Structure (BRS) technology. The Pro models may also feature a titanium frame (similar to the iPhone 15 Pro) with slight refinements.

D. Possible New Colors

  • Standard Models: Potential new colors like White, Pink, Yellow, Blue, and Black
  • Pro Models: Rumored new Space Black, Titanium Gray, and Deep Purple options

4. Performance & Chipset Upgrades

A. A18 & A18 Pro Chips

The iPhone 16 series is expected to feature 3nm chips, but with a twist:

  • iPhone 16 & 16 PlusA18 chip (based on TSMC’s N3E process)
  • iPhone 16 Pro & Pro MaxA18 Pro chip (enhanced GPU & Neural Engine)

The A18 Pro could focus on AI and machine learning improvements, aligning with Apple’s push for on-device AI features in iOS 18.

B. Increased RAM

  • Standard Models8GB RAM (up from 6GB in iPhone 15)
  • Pro Models12GB RAM (up from 8GB in iPhone 15 Pro)

This would help with multitasking and AI-driven tasks.

5. Camera Upgrades

A. iPhone 16 & 16 Plus Cameras

  • Main Sensor: Upgraded 48MP sensor with better low-light performance
  • Ultra-Wide Lens: Slightly improved sensor
  • New Vertical Camera Layout (to support Spatial Video for Apple Vision Pro)

B. iPhone 16 Pro & Pro Max Cameras

  • Periscope Telephoto Lens (now on both Pro models, not just Pro Max)
  • 48MP Ultra-Wide Lens (up from 12MP)
  • Improved Main Sensor with larger pixels for better low-light shots
  • Enhanced Optical Zoom (possibly 6x or higher)

C. Advanced Computational Photography

Apple is reportedly working on new AI-powered photo enhancements, including:

  • Better Night Mode processing
  • Real-time HDR adjustments
  • AI-based image stabilization

6. Battery & Charging Improvements

A. Bigger Batteries

  • iPhone 16: ~3,500 mAh
  • iPhone 16 Plus: ~4,300 mAh
  • iPhone 16 Pro: ~3,650 mAh
  • iPhone 16 Pro Max: ~4,700 mAh

B. Faster Charging Speeds

  • 30W Wired Charging (up from 27W)
  • Improved MagSafe Charging (possibly 20W)

C. Longer Battery Life

Thanks to the A18 chip’s efficiency, Apple may advertise all-day battery life improvements.

7. Software & AI Features (iOS 18 Integration)

The iPhone 16 will launch with iOS 18, which is expected to be a major AI-focused update. Rumored features include:

  • Smarter Siri (powered by large language models)
  • AI-enhanced Spotlight Search
  • Advanced Photo Editing with AI
  • Real-time Language Translation
  • AI-generated wallpapers & custom emojis

8. Connectivity & Ports

A. Wi-Fi 7 Support

The Pro models may include Wi-Fi 7 for faster wireless speeds (up to 40Gbps).

B. USB-C Port (Same as iPhone 15)

No major changes expected, but faster data transfer speeds (possibly USB 3.2 or Thunderbolt for Pro models).

C. 5G Modem Upgrades

The iPhone 16 may use a custom Apple 5G modem, reducing reliance on Qualcomm.

9. Storage Options

  • iPhone 16 & 16 Plus128GB, 256GB, 512GB
  • iPhone 16 Pro & Pro Max256GB, 512GB, 1TB, 2TB (new option)

10. Other Possible Features

  • Under-Display Face ID (still uncertain)
  • Temperature Sensor (similar to Apple Watch)
  • Enhanced Haptics (new Taptic Engine)
  • Better Thermal Management (for sustained performance)

Conclusion: Should You Wait for the iPhone 16?

If you’re using an iPhone 13 or older, the iPhone 16 could be a significant upgrade with its better cameras, AI features, and performance improvements. However, if you already own an iPhone 15, the changes may not be drastic enough to justify an upgrade.

As always, Apple’s official announcement will reveal the full picture. Until then, these rumors paint an exciting future for the iPhone 16 series!

Would you upgrade to the iPhone 16? Let us know in the comments!

Continue Reading

Tech

Smart Home Setup Tips: A Comprehensive Guide for 2025

Published

on

By

Smart Home Setup Tips: A Comprehensive Guide for 2025

Introduction

The concept of a smart home has evolved from a futuristic idea to an everyday reality. With advancements in technology, homeowners can now automate lighting, security, entertainment, and even kitchen appliances with just a few taps on their smartphones.

However, setting up a smart home can be overwhelming, especially for beginners. With so many devices, platforms, and protocols available, knowing where to start is crucial. This guide provides essential smart home setup tips to help you create a seamless, efficient, and secure automated home.

1. Plan Your Smart Home Ecosystem

Before purchasing any smart devices, it’s important to define your goals and priorities. Ask yourself:

  • What do I want to automate? (Lighting, security, climate control, etc.)
  • What is my budget?
  • Do I prefer a centralized system or standalone devices?
  • Which voice assistant do I want to use? (Google Assistant, Amazon Alexa, Apple HomeKit, etc.)

Choosing a Smart Home Platform

Most smart devices work with one or more of the following ecosystems:

  • Amazon Alexa – Best for voice control and wide compatibility.
  • Google Assistant – Great for seamless integration with Android and Google services.
  • Apple HomeKit – Ideal for iPhone users with a focus on privacy.
  • Samsung SmartThings – A flexible hub that supports multiple protocols (Zigbee, Z-Wave, Wi-Fi).

Pro Tip: Stick to one ecosystem for better compatibility and easier management.

2. Ensure a Strong Wi-Fi Network

A stable and fast internet connection is the backbone of any smart home. Here’s how to optimize your network:

  • Upgrade Your Router: Invest in a dual-band or tri-band Wi-Fi 6 router for better performance.
  • Use Mesh Wi-Fi Systems (like Google Nest Wi-Fi or Eero) for larger homes to eliminate dead zones.
  • Assign Static IPs or Reserved DHCP for critical smart devices to prevent connectivity drops.
  • Set Up a Guest Network for smart devices to enhance security.

3. Start with Essential Smart Devices

If you’re new to smart homes, begin with these basic yet powerful devices:

A. Smart Lighting

  • Smart Bulbs (Philips Hue, LIFX) – Control brightness and color via app or voice.
  • Smart Switches (Lutron Caseta) – Replace traditional switches for a more permanent solution.

Tip: Use motion sensors or schedules to automate lighting.

B. Smart Plugs

  • Use smart plugs (TP-Link Kasa, Wemo) to turn regular appliances into smart ones.
  • Great for lamps, coffee makers, and fans.

C. Smart Thermostat

  • Nest Learning Thermostat or Ecobee – Saves energy by learning your habits.
  • Works with voice assistants and geofencing.

D. Smart Security

  • Video Doorbells (Ring, Nest Hello) – See and talk to visitors remotely.
  • Smart Locks (August, Yale) – Keyless entry and remote access.
  • Security Cameras (Arlo, Wyze) – Indoor/outdoor monitoring with cloud storage.

E. Smart Speakers & Displays

  • Amazon Echo, Google Nest Hub, or Apple HomePod – Central control for your smart home.

4. Automate with Routines and Scenes

Instead of controlling each device individually, set up automated routines:

  • “Good Morning” Routine – Turns on lights, adjusts thermostat, and reads the news.
  • “Away Mode” – Activates security cameras, locks doors, and turns off lights.
  • “Movie Night” – Dims lights, lowers blinds, and turns on the TV.

Platforms like Alexa, Google Home, and Apple Home allow easy automation.

5. Prioritize Security & Privacy

Smart homes are vulnerable to hacking if not secured properly. Follow these steps:

  • Change Default Passwords on all devices.
  • Enable Two-Factor Authentication (2FA) where available.
  • Regularly Update Firmware to patch vulnerabilities.
  • Use a VPN for Remote Access if accessing cameras or locks outside your home.
  • Disable Unnecessary Features (like remote access if not needed).

6. Expand with Advanced Smart Home Devices

Once you’re comfortable, consider adding:

  • Robot Vacuums (Roomba, Roborock) – Automated cleaning.
  • Smart Blinds/Curtains (Lutron Serena, IKEA) – Voice or schedule-controlled.
  • Leak Detectors (Phyn, Moen) – Prevent water damage.
  • Smart Garage Door Openers (MyQ, Tailwind) – Remote access via app.

7. Troubleshooting Common Smart Home Issues

Even the best setups face occasional problems. Here’s how to fix them:

  • Device Not Responding? Restart the device and check Wi-Fi.
  • Voice Assistant Not Working? Ensure the device is linked to the correct account.
  • Slow Performance? Reduce the number of devices on a single Wi-Fi band.
  • Compatibility Issues? Check if the device works with your chosen ecosystem.

8. Future-Proof Your Smart Home

Technology evolves rapidly. To keep your smart home up-to-date:

  • Choose Devices with Local Control (like Zigbee or Z-Wave) to reduce cloud dependency.
  • Invest in Matter-Compatible Devices – A new universal smart home standard for better interoperability.
  • Avoid Overloading Your Network – Too many devices can slow down performance.

Conclusion

Setting up a smart home doesn’t have to be complicated. By planning carefully, starting with essentials, optimizing your network, and prioritizing security, you can create a seamless and efficient automated living space.

Whether you’re a beginner or an advanced user, these smart home setup tips will help you build a system that enhances convenience, security, and energy efficiency.

Ready to transform your home? Start small, automate wisely, and enjoy the future of living!

Continue Reading

Trending

Copyright © 2017 Zox News Theme. Theme by MVP Themes, powered by WordPress.